Red and Pink "Crazy 6" Lap Quilt
I machine pieced this quilt on my Bernina 240.
I quilted this quilt on my Janome QMP-18 long arm.
Finished size: 53" x 64"
Finished size: 53" x 64"
(click on photos to enlarge)
🌹FINISHED QUILT:🌹


Front piecing: I chose pink, red and purple fabrics to create 48 blocks using the Crazy 6 specialty ruler. The blocks make a secondary pattern, appearing to be 12 large blocks.
Borders: I then surrounded the blocks with a 1.5" purple inner border, a 6" wide ribbon border made from scrappy half-rectangle-triangles, and a final 3" polka dot border using "Garden Pindot" by Michael Miller fabrics.

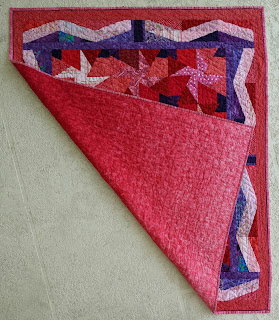
Backing: The back of this quilt is 3.5 yards of "Marble Ombre" by Moda Classic in magenta.

Quilt Stitching, Pattern: The quilt is stitched with edge-to-edge "Frill" by 627Handworks. I skewed each row to be about 1/3 to the right and below the row above. I love the texture this somewhat basic pattern created!

Quilt Stitching, Thread (Front): I used a beautiful deep pink thread called "Gerbera Daisy" (So Fine 50 #495) for the front of the quilt, to blend in with the deep colors, allowing the pieced fabric patterns to be prominent.
Quilt Stitching, Thread (Back): I used a dark red thread called "Scarlet" (So Fine 50 #413) for the back of the quilt, to allow the quilting design to stand out on the ombre magenta fabric.


Label: I tried something new with this quilt. I ordered customized printed fabric labels from EverEmblem. They are beautiful, and washed up wonderfully.
🌹INSPIRATION:🌹
This quilt was made for a long-time friend. I met her at our mutual workplace over 20 years ago, and we've been friends ever since. When I asked her what her favorite colors were, she told me red and pink...I got to stretch myself making this quilt, because pinks aren't normally a color I choose to work with. I ended up loving this vibrant, vivid quilt!
🌹PROGRESS PHOTOS:🌹
Construction-Blocks:

I started by digging through my stash of pink fat quarters and small yardage pieces. Many of the ribbon border fabrics were smaller pieces left over from previous projects I've completed.

For the first time, I tried Creative Grid's Crazy 6 specialty ruler to make the 48 blocks in the center of this quilt. I don't usually use specialty rulers (I rarely even follow exact patterns). In this case, I knew I wanted a "controlled scrappy" look, since I was using the complementary colors of reds and pinks and purples, and they don't offer a lot of contrast due to their close proximity on the color wheel.

The rulers made easy work of cutting out the 240 separate fabric pieces, and chain piecing them together into 48 squares went much quicker than I expected.
As I joined the smaller blocks into rows, and joined the 8 rows together, I made sure to stop and sliver-trim each time. The completed center section of the quilt turned out perfectly square.

With the blocks all joined together, I began to contemplate borders.
Construction-Borders:

I knew I wanted a pieced border with a "ribbon" effect, using darks and lights, to add some contrast. I used Buttons and Butterflies' half-rectangle tutorial and "Twizzle" pattern for inspiration.

I tried 4 different iterations, but just couldn't get the look I wanted. I finally realized I had made the ribbons too large - but even after reducing their size by half, the scale was still not correct.

Then I saw not only were the ribbons too long, they were too wide. As soon as I narrowed everything, the light pink ribbons surrounded by dark purple and red sides seemed to fall right into place for the pieced border.

I finally auditioned two different reds for the last outer border (a solid and a dot), and I chose "Garden Pindot" by Michael Miller fabrics.

Pinning on the final outer border.

I like to double-check the backside of a quilt before I load it onto my longarm to start stitching, to be sure all of the numerous piecing seams are flat.
Quilting:

Before basting down the top to create a quilt sandwich, I first loaded the backing and batting, and floated the top to be sure everything was squared and ready.

Then I laid out the edge-to-edge "Frill" by 627Handworks in my ProStitcher software, skewing each row by 1/3 to the right. It took a total of 41 rows to complete!

Beginning the first few of many frilly rows.

Finishing up the last few rows.

Right after I finished the quilting, I was already very happy with the texture and drape from the "Frill" stitch.

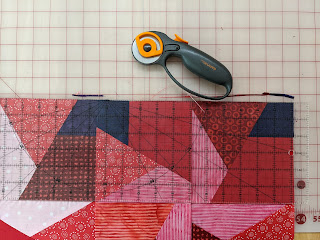
Trimming:

Squaring up the quilt after removing it from the long arm, readying it to add the binding.
Binding:


First attaching the binding strips to the back of the quilt...

...and then I used several pins and marking tools to get the flange to line up when I joined the ends together!

Then I wrapped the binding around to the quilt front.

Washing:

I machine washed the completed quilt twice (cold water, no bleach) adding dye trapping sheets (I use either Color Catchers or Color Grabbers), to absorb the deep red and magenta fabric dyes.

After washing, the quilt is now beautifully soft and wrinkled just enough. It's ready to bring my friend a bit of warmth and remind her she is loved!
🌹QUILT SUMMARY:🌹
I machine pieced this quilt on my Bernina 240.I quilted this quilt on my Janome QMP-18 long arm.
Finished size: 53" x 64"
Front piecing: 48 blocks made using the Crazy 6 specialty ruler in red, pink and purple, surrounded by 3 borders.
Back: 3.5 yards of "Marble Ombre" by Moda Classic in magenta.
Binding: The flange binding is machine sewn, using pink and purple fabrics.
Quilting: Edge-to-edge "Frill" by 627Handworks pattern. Front stitched with Superior Threads' "Gerbera Daisy" (So Fine 50 #495), and back stitched with "Scarlet" (So Fine 50 #413).
Comments
Post a Comment