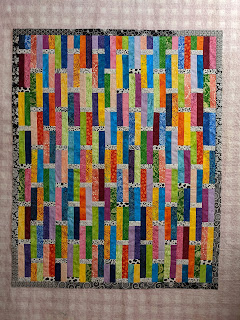
Weaved Batik Couch Quilt
I machine pieced this quilt on my Bernina 240.
I quilted this quilt on my Janome QMP-18 long arm.
Borders: One narrow scrappy black & white border, followed by a 4" pieced border and then a final 6" outer border.
Backing: The back is a muted dark red batik, a cotton blender made by Santee. It almost has a dusty, charcoal haze to it. It is a wide fabric, so luckily I didn't have to join any fabric pieces together for the backing.
Quilt Stitching, Pattern: I quilted using edge-to-edge "Joyful" by My Creative Stitches. Great movement without taking away from the quilt's vertical lines.
Quilt Stitching, Thread (Front): I used a very neutral thread called "Silver" (So Fine 50 #408) for the front of the quilt, to slightly reflect the fabric colors but not let the quilting overpower the piecing pattern.
Quilt Stitching, Thread (Back): I used an almost black thread called "Charcoal" (So Fine 50 #410) for the back of the quilt, as an homage to our mutual high school's colors (which is where I first met the quilt's recipient and her sister over 40 years ago!)
🎠INSPIRATION:🎠
This quilt is being given to the sister of a friend that I've made quilts for in the past. She is currently fighting cancer, which takes a lot of energy and can bring so many challenges. I hope she experiences some comfort when she uses her quilt.
🎠PROGRESS PHOTOS:🎠
Construction-Blocks:
As part of a huge fabric stash that I recently was fortunate to purchase from (the owner was retiring from sewing and paring down) I bought a few kits that had pieces already cut, but never assembled. I found myself the owner of several batiks strips, each 1.75" by 7".
I emailed pics of my strips to my dear quilting friend, who sent me a few photos she found online that she thought I might find inspiring. One of them was Nancy Rink's quilt called "Weave", from "Strip It Three Ways", a pattern designed for 2.5" gradient strips.
Nancy Rink's pattern wouldn't work for my size strips, but I did find the overall concept super intriguing. I paired up some of the batik strips, added a narrow horizontal black & white printed border between pairs, and the design quickly took shape.
As I placed the vertical rows onto my design wall, I realized such narrow strips were becoming even more narrow as I joined neighboring rows together. It was going to take a lot more strips to get the quilt to a decent lap/couch size than I first thought.
I finally decided there were enough pairs. The colors seemed to balance pretty well, so it was time to sew all the rows together into one piece, trim the tops and bottoms, and move on to borders.
Construction-Borders:
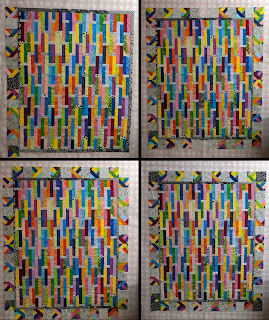
I knew this quilt would need a final wide border to finish it off, but I first wanted at least one pieced border to grow the size some more. I decided to first add a scrappy narrow inner border made from strips of black & white fabrics.
Next I wanted to use up the partial pairs that were cut off from the quilt's top and bottom ends, as well as some more leftover strips that weren't included in the vertical rows. Then I discovered this cool little block idea: by joining 5 strips together (being sure there is a contrast in between the strips), cutting them into quarter-square-triangles, and then joining two of the triangles back together, a great patterned block appears, which is perfect for a pieced border!
I decided to alternate the pieced border blocks with black & white prints, but since all of this was done without any pattern measurements, my math began to get a bit challenging when putting this border all together. I ended up rearranging the blocks a couple times and substituting different quantities of the black & white fabric squares, but I finally settled on a look that was balanced, yet still had some movement and symmetry at the same time.
Quilting:
The backing and batting are loaded, and the top is floated to be sure everything is squared and ready. I loaded this quilt side-to-side instead of top-to-bottom, so there would be less passes (rows) required to complete the quilting.
I chose edge-to-edge "Joyful" by My Creative Stitches. Love the swirls and how the pattern flows but doesn't detract from the colorful pieced fabrics.
Using the neutral "Silver" (So Fine 50 #408) thread on the top gave the exact effect I wanted - texture and movement but no bold contrasting stitching lines to pull attention away from the fabrics.
The first of 7 long rows.
Finishing up the last 10" tall row.
Trimming:
Squaring up the quilt after removing it from the long arm, readying it to add the binding.
Binding:
The binding is a great black-on-black fabric that I also purchased as part of the same lot as the batik strips. I cut 280" of it into 2.5" wide strips and then pressed it lengthwise.
...then wrapping the binding around and sewing it to the quilt front.
I've finally practiced enough that I'm very happy with the results of using my machine to attach the binding to both the front and back of the quilt. The stitching accuracy on the front is especially pleasant now. I just don't have the endless hours I would need to hand sew on every binding, so the machine method works for me.
Washing:
I machine washed the completed quilt twice (cold water, no bleach) including dye trapping sheets (I use either Color Catchers or Color Grabbers), which absorbed a lot of the dark fabric dyes. (Those blue-ish sheets used to be white!)
🎠QUILT SUMMARY:🎠
I machine pieced this quilt on my Bernina 240.I quilted this quilt on my Janome QMP-18 long arm.
Finished size: 65" x 68"
Front piecing: Sixteen vertical rows of paired batik strips, with 2 pieced borders and 1 final wide outer border.
Back: Wide fabric, muted dark red batik cotton blender made by Santee.
Binding: Black-on-black binding is attached by machine.
Quilting: Edge-to-edge "Joyful" by My Creative Stitches. Thread used on the front is "Silver" (So Fine 50 #408), and on the back is "Charcoal" (So Fine 50 #410).


Beauuuutiful!!! What size are your strips? 👍
ReplyDeleteEach strip is 1.75" wide by 7" long.
Delete