YORVBG Improv Slab Couch Quilt
I machine pieced this quilt on my Bernina 240.
I quilted this quilt on my Janome QMP-18 long arm.
Finished size: 72" x 72"
Finished size: 72" x 72"
(click on photos to enlarge)
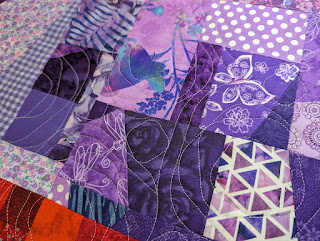
🌈FINISHED QUILT:🌈Front piecing: Using a combination of several improvisational techniques, I created fabric "slabs" from scrappy leftover crumbs. I decided to make (6) 12.5" slabs in each of the following colorways: Yellow, Orange, Red, Violet, Blue and Green, arranged in 6 rows of 6. All fabric pieces in these slabs were from my scrap and strip stash, or given to me from scrap stashes of quilting friends. Less fabric in the landfills, more fabric in a cuddle quilt!
Quilt Stitching, Pattern: I quilted using edge-to-edge "More Square Drama" from Wasatch Quilting.
Quilt Stitching, Thread: I used "Genoa Gray" (So Fine 50 #503) thread for the front of the quilt, and a dark gray "Smoke" (So Fine 50 #409), for the back of the quilt.
Label: This was a special gift I made for someone to celebrate their engagement and new home, so I chose to personalize the label by handwriting it with a permanent fabric marking pen.
Binding: I used more of the "Watercolor Meadow" by Studie e Fabrics (remnants from the backing), to make the perfect complimentary binding, attached by machine.
🌈PROGRESS PHOTOS:🌈
Construction - Blocks:
I have many, many, MANY scraps left from the more than 100 quilts I've made. Plus I collect scraps and remnants from other sewists and quilters, too. So from time to time, I have to whittle down my scrap pile, get creative, and use those scraps to make an "improv" or "slab" quilt.
🌈🌈🌈
For this quilt, I created 12.5" square fabric slabs by using a combination of many techniques. The process is very freeing and really feeds my hankering to be creative. Here are some links to just a few of the many improvisational processes available:Quilting:
While loading the backing, I roll the loaded fabric back and forth between the back and front bar a couple times. This really helps to evenly distribute tension. Loved working with this 104"-wide backing fabric - no additional piecing required for backing a 72" square quilt.
Once the batting layer is basted down, I float the quilt top and square it to the frame. I then baste the rolled quilt sandwich completely, down one side, across the belly bar, and back up the other side, advancing and repeating, before I actually quilt it.
I used ProStitcher software to resize, repeat, and wrap the edge-to-edge "More Square Drama" from Wasatch Quilting. I have really grown to like the end result of this particular stitching pattern...I also recently used it on this quilt.
Beginning the first of 7 rows.
No matter which section the "Genoa Gray" (So Fine 50 #503) was stitching on, it seemed to perfectly reflect back each fabric color, so the stitching didn't overpower any of the quilt top, only complimented it.
Trimming:
I trimmed away the extra backing by measuring exactly 12" from the seam where the blocks joined one another. That way the quilt's outer edge remained straight and parallel to the squared quilt.
Binding:
I joined together enough 2.5" strips of the backing ( "Watercolor Meadow" by Studie e Fabrics) until I had a total of about 325" of binding strips. Then I ironed them in half.
First I attach the binding fabric to the back of the quilt, using my sewing machine and a scant 1/4" seam.
Then I wrap the binding around to the front and attach it to the quilt.
When attaching bindings by machine to the quilt's front, I use my Bernina 240's blind hem foot, which helps to make even, straight seams.
Old fashioned corsage pins help me create nicely mitered corners.
Washing:
I machine washed the finished quilt twice (cold water, no bleach) using dye trapping sheets (I use either Color Catchers or Color Grabbers). I never gift a quilt without washing it first, so its texture will show to the fullest and its softness can be enjoyed immediately by the recipient.
🌈QUILT SUMMARY:🌈
I machine pieced this quilt on my Bernina 240.
I quilted this quilt on my Janome QMP-18 long arm.Finished size: 72" x 72"
Front piecing: 6 rows of (6) 12.5" scrappy "slab" blocks made from leftover crumbs, arranged in a 6 x 6 grid.
Binding: Made from the backing fabric, machine attached.
Quilting: Edge-to-edge "More Square Drama" from Wasatch Quilting. "Genoa Gray" (So Fine 50 #503) thread on the front of the quilt, and "Smoke" (So Fine 50 #409) on the back.


We can't thank you enough for this quilt! We understand the incredible amount of effort that went into it, and the finished product is SO beautiful, and very much to both of our tastes, as well! It's also very soft and comfortable, and really fun to find little details in the patterns!
ReplyDelete—Fox & Alex
You're both so welcome! Congratulations again <3
Delete