Sports Themed Full-Sized Quilt
I machine pieced this quilt on my PFAFF Expression 710.
I quilted this quilt on my Janome QMP-18 long arm.
Finished size: 75" x 88"
Finished size: 75" x 88"
(click on photos to enlarge)
🏈⚾🏀FINISHED QUILT:🏀⚾🏈
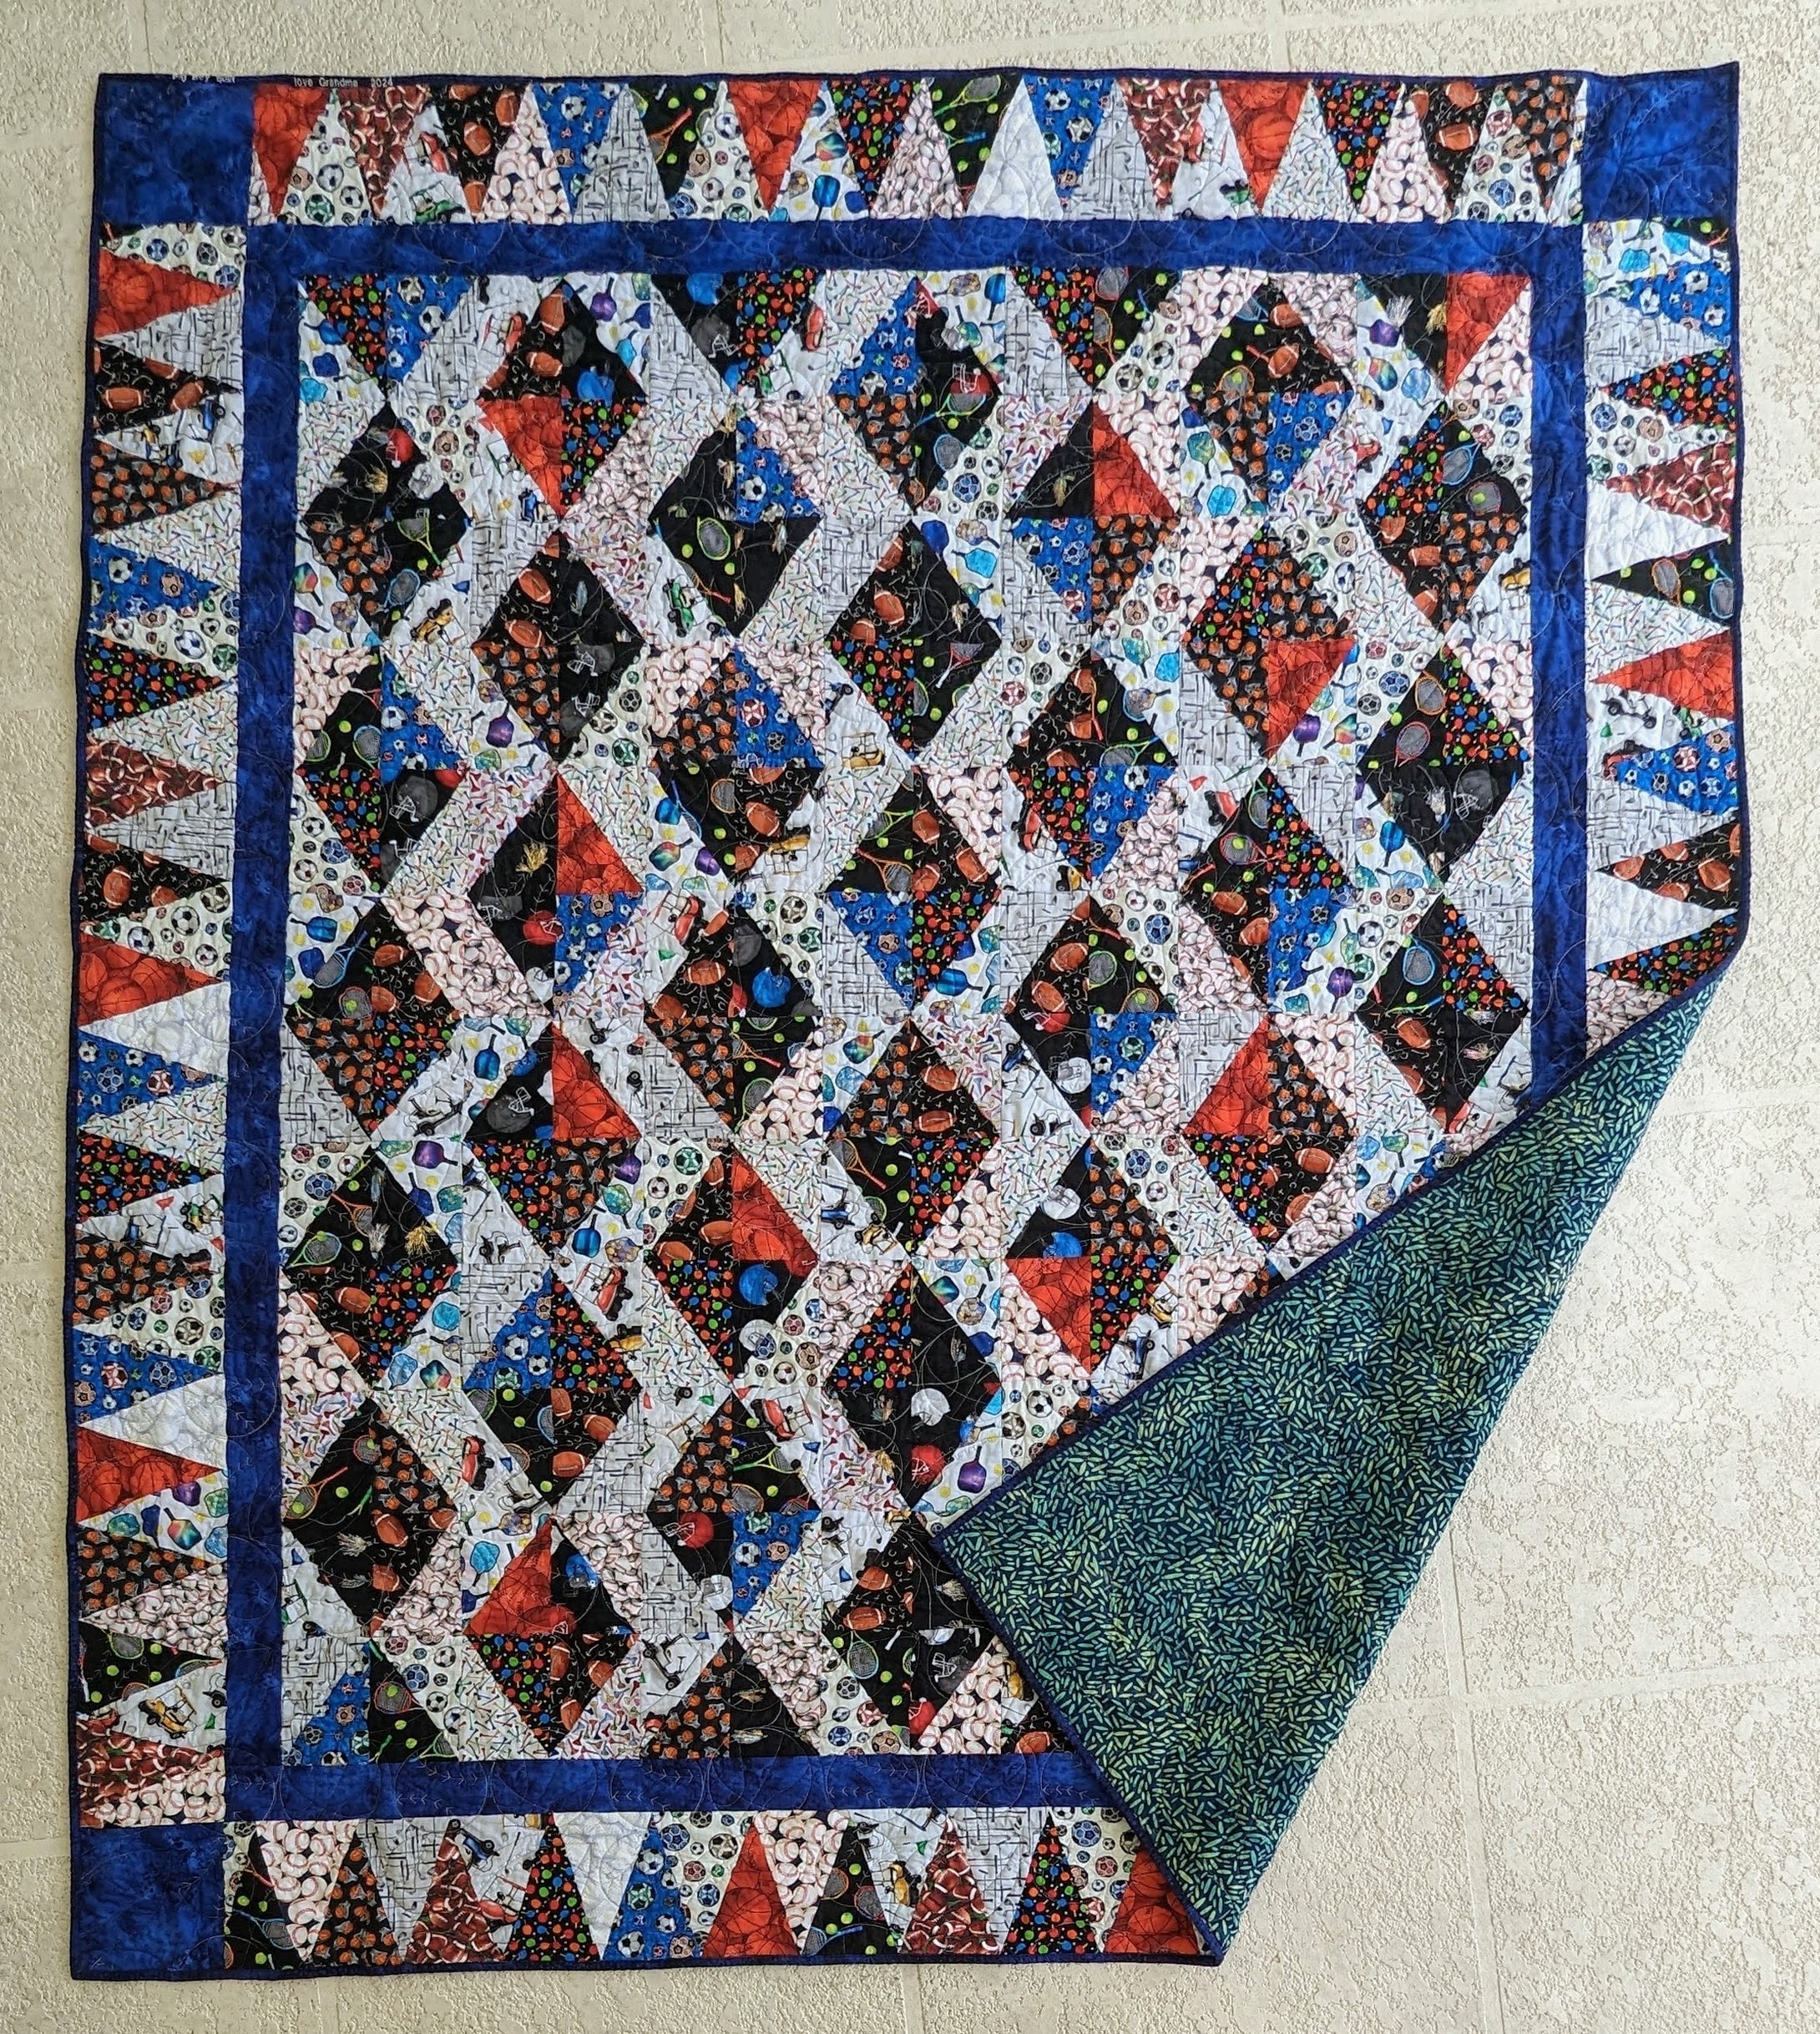


Front piecing: A 7x7 grid of 38 full diamonds (4 half-rectangle-triangles - HRTs each) and 8 half diamonds (2 HRTs each) surrounded by a blue inner border, and then a final outer border of 122 pennant-shaped triangles...all created using 16 different and distinct sports-themed novelty fabrics.


Backing: The backing fabric is new Robert Kaufman Artisan Batik yardage that I purchased from an estate sale.

Quilt Stitching, Pattern: I quilted using edge-to-edge "Football Basketball and Baseball" from Wasatch Quilting.

Quilt Stitching, Thread: I used "Genoa Gray" (So Fine 50 #503) thread for the front of the quilt, then chose "Cashew" (So Fine 50 #405), for the quilt back.

Label: I embroidered a label right onto the binding, still one of my favorite ways to personalize a quilt's label.
🏈⚾🏀PROGRESS PHOTOS:🏀⚾🏈
Construction - Blocks:
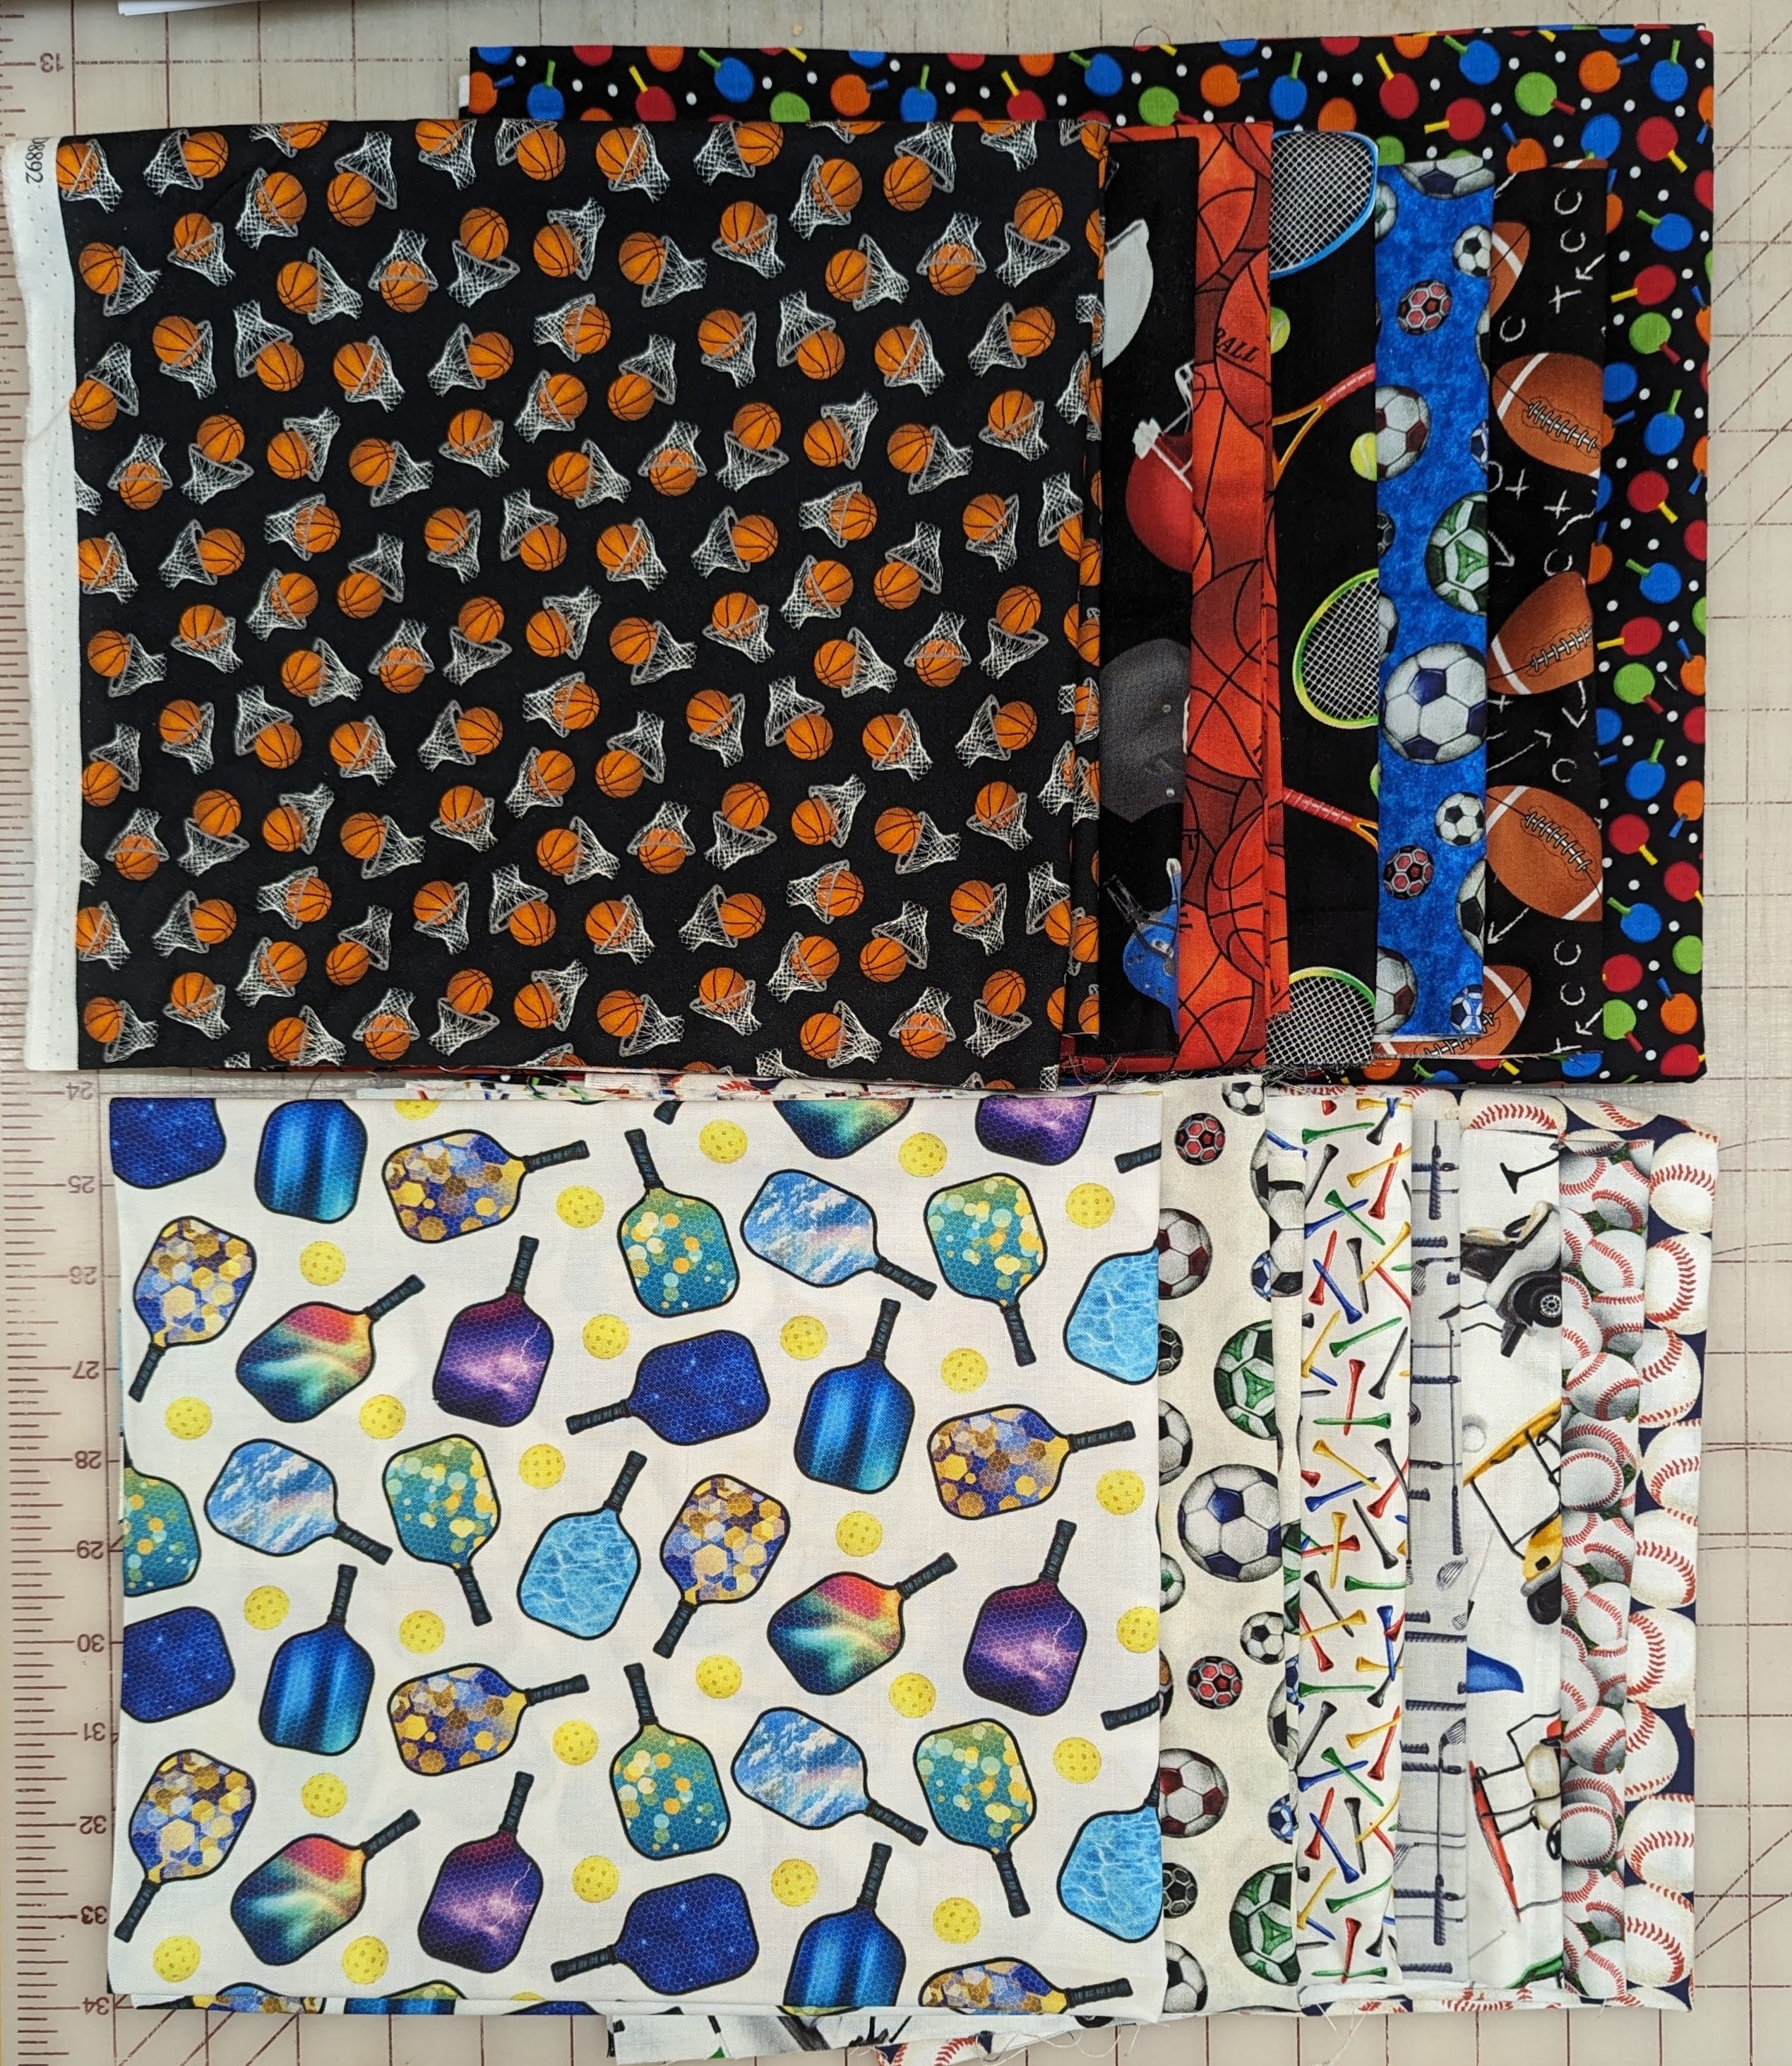
I collected sports-themed quilting cottons (both at my local quilt shop as well as online), and came up with the following:
football
soccer
baseball
basketball
tennis
pickle ball
ping pong
golf
I could see that the fabrics fell into one of two categories: white backgrounds or dark backgrounds. So I began to search for a quilt block that would highlight the fun patterns, but also incorporate a strong light-vs-dark contrast.


I cut 5"x7" blocks from all the fabrics, then began chain piecing them together to make the half-rectangle-triangles (HRTs).

I pressed every single block using starch, since I was working with biased edges. I made a total of 170 HRTs by the time I completed the diamond portion of the quilt.

Before I joined 4 blocks together into a diamond, I sliver-trimmed all edges to keep the blocks square. This really helps the blocks stay straight and even when I'm sewing them together into a quilt top.


Construction - Borders:

3" black inner border with 8" pennants or 6" pennants
1.25" blue inner border with 8" pennants or 6" pennants
3" blue inner border with 8" pennants or 6" pennants


Piecing finally finished - ready to load onto the longarm and be stitched into a quilt sandwich!
Quilting:

After loading the backing, I rolled the fabric back and forth between the front and back bars a couple times, which helped even tension. The right side of this Robert Kaufman Artisan Batik print faces the floor when it is loaded onto the longarm, and the wrong side faces up, into the inside of the quilt sandwich's middle, so what you see in this above photo is the wrong side of the batik.


After the backing is ready, a double-layer of batting is draped over the backing, and then the pieced quilt top is floated as a final layer.
The quilt sandwich is then completely basted through all 3 layers, stitching down one side, across the belly bar, and back up the other side, advancing and repeating, before it is finally ready to be quilted. This pre-basting saves me hours, due to a straighter, more even quilting experience every time!

This quilt is being made for my sports-loving grandson's transition from his nursery to his "big boy room", so I used my ProStitcher software to resize, repeat, and wrap the edge-to-edge "Football Basketball and Baseball" design from Wasatch Quilting.

Starting the first of 9 rows.


Beginning stitching on row 8, with just one more row left to go.

As I unrolled and set up to quilt the 9th and final row, I saw that the double-layered batting was not laying flat. I think using two layers caused some fullness in the batting, even though the fabric top itself was flat.

I employed the "soup can" method to put a little tension on the folded area of the 2-layered batting so it would smoothe itself as the stitches passed over that section.

The "soup can" method wins again!
Label:

After the binding strips are ready, but before they are attached to the quilt, I embroidered the label directly onto the binding fabric.
Trimming:

When trimming, I lined up my ruler to cut exactly 7" from the outer edge of the inner blue border. This helped the quilt remain square, and also assured all of the pennants were the same finished length.
Binding:

I joined together several 2.5" strips of blue & black patterned batik until I had a total of about 380" of binding strips. Then I ironed them in half.

First I attach the binding fabric to the back of the quilt, using my sewing machine and a scant 1/4" seam.


Then I wrap the binding around and sew it to the front of the quilt.

I use a couple of old-fashioned corsage pins to create nice miters at each corner.
Washing:

I machine washed the finished quilt (cold water, no bleach) using dye trapping sheets (I use either Color Catchers or Color Grabbers).


🏈⚾🏀QUILT SUMMARY:🏀⚾🏈
I machine pieced this quilt on my PFAFF Expression 710.
I quilted this quilt on my Janome QMP-18 long arm.
Finished size: 75" x 88"
Front piecing: Using 16 different sports-themed fabrics, a 7x7 grid of 38 full diamonds and 8 half diamonds, surrounded by an inner blue border, and a final outer border of 122 pennant-shaped triangles.
Back: Robert Kaufman Artisan Batik in greens and blues.
Binding: Machine sewn blue & black batik.
Quilting: Edge-to-edge "Football Basketball and Baseball" design from Wasatch Quilting. "Genoa Gray" (So Fine 50 #503) thread on the front, and "Cashew" (So Fine 50 #405), on the back.
Comments
Post a Comment